Contents
Want to create your own blog, but don’t want to get tied into any of the big hosted solutions or subscription publishing sites? This article describes how to use GitHub Pages with Hugo to create, maintain, and host your own blog site.
Overview
Prerequisites:
- A basic knowledge of git and GitHub.
- Git version 2.24.3 or higher
- Mac development machine
- Windows and Linux are also supported. Much of what’s described here is applicable to both of these. But the exact steps I followed were performed on a Mac.
- For significant customizations beyond what’s available natively in Hugo and the chosen Hugo theme, a basic understanding of HTML and CSS will be required. More information on customizations can be found in the Appendix below
This article is a fairly detailed tutorial on how to create a full featured website/blog using Hugo and GitHub Pages. If you just want a quick overview of how to use Hugo I recommend going to the Hugo Quickstart page. If you want a quickstart on setting up a Hugo/GitHub Pages site I recommend going to the Hugo GitHub Pages quickstart page.
At its core GitHub Pages is a combination of a GitHub repository and a published web site. One consequence of this is that any commit to the master branch of the repository is immediately published. One way to create a GitHub Pages website is to also create an associated “development” GitHub repository. This is what is described here.
Hugo is an Open Source static website generator. It is quite powerful and the websites that can be created with Hugo can be quite sophisticated. Hugo is the base engine used to interpret how to create a website based on a predefined template. Hugo calls these templates themes. “Skin” is another word for theme. A theme is a combination of HTML and CSS. The HTML is used for site layout. CSS is used to define colors, fonts, font size, and other non-layout related attributes that define how the website looks. This combination is quite powerful. The website’s page definitions themselves, i.e., the website’s content, are defined using standard Markdown syntax.
Hugo also comes with an HTML server that can be used during development to provide immediate feedback on any changes that are made to web pages. Hugo can be used in 2 ways:
- Development mode - In this mode Hugo is using its HTML server to render pages as they are being modified during development. Running the server during development provides immediate feedback when changes are made to the content.
- Build mode - Hugo will also generate a complete static website based on a theme’s layout, CSS, and the markdown files that define the content. The output of this mode is what will be published.
The Hugo themes as well as the website’s page definitions are stored in what I above called the “development” repository. This is the primary authoring space. The Hugo web server operates against this repository. Through the magic of Git Submodules, the final set of committed changes to the master branch in the development repository are immediately made available in the GitHub Pages repository.
Brief segue on Git Submodules:
Git Submodules are a way of including one, hosted, GitHub repository in another, hosting, repository. The entire content of the hosted repository is available in the hosting repository as if it was just a normal subdirectory in the hosting repository. Changes to the hosted repository can be made in the context of the hosting repository. Committing any such changes are immediately available in the hosted repository.
In the context of Submodules, the GitHub Pages repository is the hosted repository. It contains the published content of the website. In contrast, the repository containing the Hugo theme(s) and the development versions of the content is the hosting repository. When the website content is ready for publishing Hugo is used to generate the static website. Hugo generates the content into the submodule associated with the, hosted, GitHub Pages repository. When ready, the changes are committed in the hosting repository and they become immediately available, and thereby published, in the GitHub Pages repository.
Initial GitHub setup
The two repositories, the GitHub Pages repository and the hosting development repository, need to be created. There are 2 options for the GitHub Pages repository:
- Personal or Organizational
- Project
See the GitHub Pages help documentation for more details about the differences. This article describes how to create a Personal GitHub Pages repository.
Creating the GitHub Pages repository is fairly straightforward, but there is one very important restriction on its name. The repository’s name must be of the form <github_username>.github.io. For example, smith.github.io where smith is the associated user’s account name. This will be the URL of the website. So the GitHub pages repository is just a normal GitHub repository, just with a very specific name. We’ll use this repository name, smith.github.io in the rest of the article when referring to the GitHub Pages repository. See the GitHub Pages quickstart guide if you need more details on how to create a repository.
The second step is to create the repository where the website development/authoring will take place. This is just a normal GitHub repository. For the purposes of this article, we’ll use myblog.dev.repo for the name of the development repository. See the GitHub documentation if you need more details about how to create a repository.
Install Hugo
There are a number of ways to install Hugo:
- There are binary releases available on the Hugo downloads page.
- On a Mac using Homebrew is the simplest,
brew install hugo. - On Linux, with Homebrew installed,
brew install hugo. - There are a couple of ways to install on Windows using Chocolatey:
- choco install hugo[-extended] -confirm
- scoop install hugo[-extended]
Docker images are also available. For more details on installing Hugo see the Hugo documentation.
Create a basic site
Initialize the new site
The first thing to do is to clone the development/authoring repository on to your local machine:
git clone git@github.com:smith/myblog.dev.repo.git
With the GitHub repositories setup and Hugo installed it’s time to initialize the website. Hugo provides this capability through the hugo command line:
- Change directories into the root of the
myblog.dev.reporepository - Run
hugo new site .hugo new siteis telling Hugo to create a new site. The final parameter in the command, the., is telling Hugo which directory to create the new site. In this case we’re going to create it in our development/authoring repository,myblog.dev.repo.
hugo new site <dirname> creates the following directory structure:
site_root
  |--layout
  |--content
  |--static
  |--data
  |--themes
  |--config.toml
  +--archetypes
The directories and files that we’re interested in for this article are:
content- this is where content under development is located, i.e., the various markdown files for a site’s pages.static- content that doesn’t change, such as imagesthemes- Where the site’s theme(s) are locatedconfig.toml- The basic configuration for the site, e.g., the site’s namearchetypes- Template(s) used by thehugo new <contentdir/contentfile.md>command to create new content markdown files
Pick and install the site’s theme
The next step is to choose a theme to use. See the Hugo themes page and select the one that looks best to you. The Hugo Ananke theme is a popular one. I chose the Clean White theme. Once you’ve picked a theme you need to add it to the development/authoring repo. Like with the GitHub Pages repo, this is accomplished via a git submodule:
git submodule add <theme-github-url> <target-directory>
I chose a customized version of the Clean White theme:
git submodule add git@github.com:youngkin/hugo-theme-cleanwhite-rsy.git themes/hugo-theme-cleanwhite-rsy
The <target-directory> should be a subdirectory of themes. themes is where Hugo expects loaded themes to be located.
I’ll discuss my reasons for customizing the Clean White theme, as well as describe what I did, later in this article.
Some basic customization of a Hugo generated website is specified in the config.toml file. For now we’ll just tell Hugo to use our chosen theme.
echo 'theme = "<theme-name>"' >> config.toml
In my case I used
echo 'theme = "hugo-theme-cleanwhite-rsy"' >> config.toml
The theme name is the name of the directory where you placed the theme.
Test the new site locally
Now it’s time to create some content and test everything we’ve done so far. The first step is to create some content:
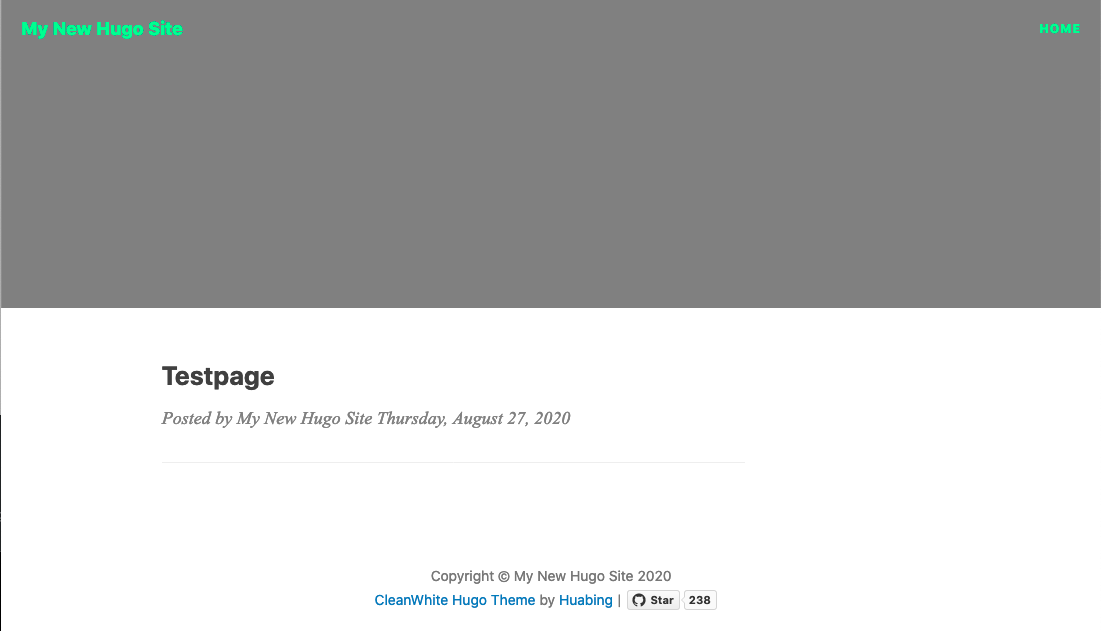
hugo new post/testpage.md
The new page will be located at content/post/testpage.md, post being the parent directory given in the previous command. This command places all content in the content directory. content is one of the directories Hugo uses as the source of content when generating the static web site. The file will look something like this:
---
title: "Testpage"
date: 2020-08-27T13:43:09-06:00
draft: true
---
You can inspect the generated file. The generated content comes from the archetypes/default.md file which is the template used for all new content. The content between the --- lines is “front matter” for the page. Text after the 2nd --- line is the body of the web page.
“Front matter” is the Hugo term for the information at the top of the page used to create a page’s rendered title as well as some other metadata that is placed in the associated HTML file’s
<meta>tags in the page’sheadsection. Don’t worry too much if you don’t understand all this.
The next step is to test the installation by starting the Hugo web server and navigating to the development site:
hugo server -D
Near the bottom of the logged output you’ll see a line like this:
Web Server is available at http://localhost:1313/ (bind address 127.0.0.1)
Copy the URL into a browser and you should see the home page of the new site. Depending on the theme chosen, you should see something like this:
Authoring a site
Now we’re ready to start creating the actual site that we want to publish. The first thing you might want to do is delete the content/post/testpage.md file created previously. This was created just to test the installation and is no longer needed.
Configuration
As mentioned above, the basic configuration for a Hugo website is specified in the config.toml file. Hugo’s Getting Started documentation covers configuration in detail. The configuration for this blog is a basic, but functional, configuration. It looks like this (remember, smith is our fictional GitHub account name, you’ll need to replace it with your own account name):
baseurl = "https://smith.github.io"
title = "Rich Youngkin"
theme = "hugo-theme-cleanwhite-rsy"
languageCode = "en-us"
paginate = 5000 #frontpage pagination

[markup]
  [markup.goldmark]
    [markup.goldmark.renderer]
      unsafe = true

[params]
  header_image = "images/main_go_wideandtall_darklayer.jpeg"
  title = "Software Engineering"
  slogan = "$ grep -rni \"The how's and why's\" ."
  SEOTitle = "Rich Youngkin Blog"
  keyword = "Rich, Youngkin, Raspberry, Pi, Docker, Kubernetes, Go, Golang, Microservice"

  # Sidebar settings
  sidebar_about_description = "Father, Husband, Skier, Cyclist, and, oh yeah, Software Developer"
  sidebar_avatar = "images/MeAtJackson.jpeg"
  about_me = true

  featured_tags = true
  featured_condition_size = 2 # How many posts have to have a given tag to be featured (greater-than)

  image_404 = "images/404-bg.jpg"
  title_404 = "We couldn't find what you were looking for..."

  omit_categories = false

  [[params.addtional_menus]]
  title =  "ABOUT"
  href =  "/top/about/"

  [params.social]
  rss            = true
  email          = "rich.youngkin@gmail.com"
  linkedin       = "https://www.linkedin.com/in/richard-youngkin-0749763"
  github         = "https://github.com/youngkin"
  medium         = "https://medium.com/@RichYoungkin"
  stackoverflow  = "https://stackoverflow.com/users/2646870/rich"
  reddit         = "https://www.reddit.com/user/elevation5280"
Taken line-by-line, here’s what each one means:
baseurl- This is the URL of the published web site. For a GitHub Pages site it must be of the formhttps://<your-github-id-here>.github.io, e.g.,https://smith.github.io.title- This is the text displayed in the top left, header, area of every page on the site. It is a button control that will take you to the home page. Typically it’s your name.theme- The theme used by the sitelanguage- The IETF language tag specifying the primary language of the website. The language code, e.g.,en, can have a suffix specifying an optional country code or region to subdivide the language into various dialects.en-usmeans United States English.en-gbmeans Great Britian English.paginate- how many blog entry summaries to display on the home page[markup]- this is a section that specifies the Markup/down syntax used. It’s optional. The Goldmark renderer is used by default. Blackfriday was the previous renderer and can still be used if specified. Goldmark has more capability than Blackfriday, but by default it won’t render HTML tags due to security concerns. I wanted to use HTML tags in my pages, primarily for image scaling and placement, as well as customizing text rendering. I had originally swapped out Goldmark for Blackfriday but later decided that I might like the extra functionality provided by Goldmark. To get the HTML tag support I needed, I had to add this[markup]section and setunsafe = true. See the Hugo Configure Markup document for more details.[params]- These are the basic parameter settings availableheader_image- the background image to use as the default in the headers of all pages. It is the only image that will be used for the home and about pagestitle- This is the text used in the title, or banner, displayed at the top of every web page.slogan- This is a subtitle displayed just below the title in the header of all web pagesSEOTitle&keyword- These have something to do with search engine optimization. I included them in the hope that this would make my site more visible. More information can be found in this tutorial.sidebar_about_description,sidebar_avatar, &about_me- The sidebar contains a concise “about me” biography. You can use the description to provide a short bio and the avatar to provide an image.about_mecontrols whether the sidebar is shown.featured_tags&featured_condition_size- These are used to specify whether you want to display tags used to describe pages to show up in a tag cloud on each page.feature_condition_sizespecifies the minimum number of articles that must have a given tag before that tag shows up in the tag cloud. It is important to note that tags will only be displayed whenfeature_condition_size + 1articles with a given tag exist.image_404&title_404- These specify how a 404 Not Found page looks. One is the image, the other is the textual title.omit_categories- Categories are like a higher level tag. For example, New Mexico, Colorado, Utah, Wyoming, Idaho, and Montana might all be tags for articles pertaining to those U.S. states. There might be a category “Best Ski Areas in the World” that could be used to group those tags into a higher level grouping. Defined Categories can be included in the navigation bar at the top of each page.omit_categoriescontrols whether categories will be displayed in the top navigation bar.[[params.additional_menus]]- This allows the specification of additional menu items to be put in the top navigation bar, for example an “About” page.[params.social]- This entire sub-section is used to put badges associated with different social media sites on the Hugo generated site. There are other social media sites available such as twitter and facebook.
Archetypes
Archetypes are templates used by Hugo when new web pages are created via the hugo new <some-post-file> command. They are useful because there is a “front matter” section at the top of each page describing some basic characteristics like the page title, description, and date. Without archetypes this “front matter” would have to be manually typed or copied on each new web page. While Hugo installs a default archetype at archetypes/default.md, you’ll probably want to create your own. I have a file located at archetypes/post.md. The name post.md is meaningful to Hugo. It is the archetype Hugo will use, if present, when generating posts. There are other archetype file names and locations that are meaningful to Hugo. You can find more detail about archetypes at the Hugo Archetypes page.
My archetypes/post.md file looks like this:
---
title: "{{ replace .Name "-" " " | title }}"
#description: <descriptive text here>
date: {{ .Date }}
draft: true
toc: false
image: ""
tags: []
categories: []
---

# Descriptive text here...
<!--more-->
Here’s what each line means:
---- these lines delineate the “front matter” section of the pagetitle: "{{ replace .Name "-" " " | title }}"- specifies that the page’s title will be generated from the file name after replacing dashes ('-') with spaces. This is a quick, handy, way to generate titles automatically. For example,My-New-Post.mdbecomes “My New Post” in the page’s title.description- specifies text to be used in an article’s summary on the home page. This text will not be displayed in the article. It is related to the# Descriptive text here...line a little lower in the file.date- replaced with the date the post was created. The generated date can be changed if you want to modify it, for example after updating the page. There are more sophisticated things you can do with dates, such as published date, last modified date, expiration date, etc. Those all have special meanings. See the Hugo documentation for more details.draft- specifies whether a page is in draft or publish state. Pages in draft state can be seen when viewing the site running on the Hugo web server, but they will not be visible from a published web site such as GitHub Pages.toc- Iftrue, this will create a table of contents at the top of the article. This is a customization. See the appendix, comments section, below for details.image- specifies the image to display at the top of the page. If not specified, theheader_imageinconfig.tomlwill be used.tags- specifies a comma separated list of low level subject groupings. Taking my example from above, U.S. states might be an appropriate subject grouping for pages pertaining to U.S. states. For example,tags: ["Colorado", "Utah", ...].categories- specifies a specifies a comma separated list of high level subject groupings. Again, taking my example from above, some U.S. states can be put in the category of “Best Ski Areas in the World”.# Descriptive text here...&<!--more-->- These lines are used as an alternative to thedescriptionline in the “front matter” section. This can be used if the amount of descriptive text desired is more than can be comfortably put in thedescriptionline.<!--more..>is used to indicate the end of this type of descriptive text. Unlikedescriptionabove, this text does appear in the article. An alternative to both thedescriptionline and these lines is to not specify either. In this case the first 70 words of the article will be used in the article summary.
Writing
Now that we have our repositories setup, Hugo installed, our initialized Hugo development repository, and a basic understanding of Hugo website and page configuration, we can start authoring content. All content is written using Markup syntax. See the Hugo Markdown Guide for more information and syntax details. As noted in the Configuration section above, using the Goldmark unsafe option allows you to use standard HTML tags in the content if desired.
Publishing content to GitHub Pages
At some point you’re going to be ready to make your site live. To do this you’ll want to generate the static content to be published from the development content. This development content is generally found in the content and static directories that were created when the site was initialized. The output of the generation process is generally placed in the public directory, but this can be modified. For our purposes we’re just going to let Hugo take this default behavior.
Linking the development repository to the GitHub Pages repository
This step only needs to be done once.
Before you can publish to your GitHub Pages site, you need to link your development repository, myblog.dev.repo in our case, to your GitHub Pages repository. We’re using smith.github.io as the GitHub Pages repository name. To do the linking we’ll use Git Submodules as discussed previously. The command to use is:
git submodule add -b master git@smith.github.io.git public
The important parts of the command are:
-b master- This links to the hosted repository’smasterbranchpublic- This links the hosting, i.e., this repository’spublicdirectory, with the hosted repository. So any changes in thepublicdirectory, when committed, will be pushed to the GitHub Pages repository,smith.github.io.git.
To illustrate the linking of the development repository to the GitHub Pages repository do the following:
git remote -v
The output should look something like this:
origin	https://github.com/smith/smith.github.io.git (fetch)
origin	https://github.com/smith/smith.github.io.git (push)
Publishing the site
When you’re ready to publish the site you’ll need to generate the static content. This is done by running:
./deploy.sh
This file is a slightly modified version of the deploy.sh file described on the Hugo Hosting on GitHub tutorial. The deploy.sh script looks like this:
#!/bin/sh

# If a command fails then the deploy stops
set -e

printf "\033[0;32mDeploying updates to GitHub...\033[0m\n"

# Create commit message
msg="rebuilding site $(date)"
if [ -n "$*" ]; then
	msg="$*"
fi

# Build the project.
echo ""
echo ""
echo "Committing changes to $(pwd)"
hugo -D

# Go To Public folder
cd public

# Add 'public' (Github Pages repo) changes to git and commit/push.
echo ""
echo ""
echo "Committing changes to $(pwd)"
git add .
git commit -m "$msg"
git push origin master

# Add this repos changes to git and commit/push. First 'cd' out of public
cd ..
echo ""
echo ""
echo "Committing changes to $(pwd)"
git add .
git commit -m "$msg"
git push origin master
deploy.sh does several things:
- It builds the static content via
hugo -D - It stages everything in the
project-root/publicdirectory for commit viagit add . - It commits everything in the
project-root/publicdirectory viagit commit -m "<commit message>(the “commit message” is generated by the script) - It pushes the changes to master via
git push origin master - It stages everything in the
project-rootdirectory for commit viagit add . - It commits everything in the
project-rootdirectory viagit commit -m "<commit message> - It pushes the changes to master via
git push origin master
CAUTION!!!!! Everything in
publicand theproject rootdirectories is staged for commit. This means that all additions or changes you made will be committed. This can be an issue if you have new temporary files that you have no intention of committing. If you don’t want this behavior you can modify the script to comment out thegit add .commands.
The finished product
This web site! The source code is available on GitHub for:
References
- Hugo Quickstart page
- Hugo GitHub Pages quickstart page
- Git Submodules
- GitHub Pages help documentation
- GitHub Pages quickstart guide
- GitHub documentation
- Hugo downloads page
- Hugo installation documentation
- Hugo themes page
- Ananke theme page
- Clean White theme page
- Hugo’s Getting Started documentation
- IETF language tag spec
- Hugo Configure Markup document
- SEO tutorial
- Hugo Archetypes
- Hugo Configuration
- Hugo Markdown Guide
Appendix
This appendix describes some additional changes I made that you might also want to consider.
Add Support for Comments
Any good blog needs to support comments. My basic requirements for commenting were:
- Free - Blogs with comments are great, but I’m not willing to pay for it.
- Hosted - I didn’t want to have to stand-up my own comments server
Hugo does come with out-of-the-box support for Disqus. Disqus does have a free option, but it’s ad supported. I don’t like ads. So I did a little research on free alternatives. Sharp eyed readers will notice this article is published by Hyvor, one of the free alternatives. I also looked at using GitHub comments. I chose not to use GitHub comments due to the requirement that commenters have a GitHub account. Using GitHub comments also felt a bit clunky for sevearl reasons:
- The comments section of each article was a link to an associated GitHub issue. This link wasn’t always obvious
- Following the link takes the commentor to GitHub, away from the blog. This felt disjointed.
- The blog author has to create an associated GitHub issue for each blog page.
So despite the potential for bias in the Hyvor article, it seemed to cover the bases so I went with Hyvor as my commenting platform. If you think you’d like to use GitHub for comments, GitHub comments for a Hugo-based blog describes how to accomplish this.
Hyvor
Using Hyvor as a commenting platform is straightforward:
- Get a Hyvor account
- Configure your Hyvor account
- Add(Install) Hyvor to your blog
- Customizing the appearance and other aspects of how comments will be used
Completing the first step is simply a matter of registering your account. Just fill in the details on the Sign Up For Hyvor page.
The second step, configuring my Hyvor account, was a little less straightforward, at least for me. Once you’re logged into the Hyvor site you’ll be placed on your account page. On that page is a Website URL entry. This is where you put the top level URL for your blog (e.g., https://smith.github.io). However from here, things are a bit more murky. You’ll need to go to your console to do more. To do that you click on the text “Hyvor Talk” at the bottom of the page:
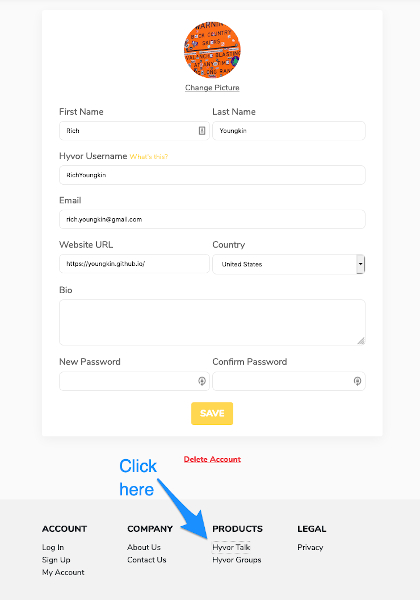
This will take you to another page containing a “Go to Console” button.

Click on the button and your console will look something like this:
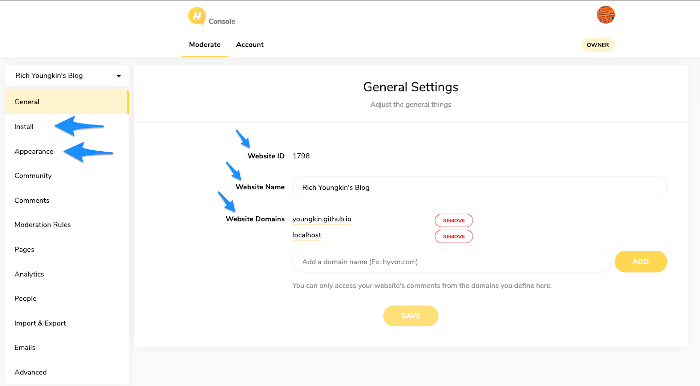
Hyvor assigns the Website ID. You fill in the rest. I added an additional Website domain, localhost, so I could test on my local machine.
The third step involves adding Hyvor to your blog. To do this click on “Install” in the left-hand navigation section. Then click on the “Manual Install” option. After doing this you should see 2 steps described in the resulting page.
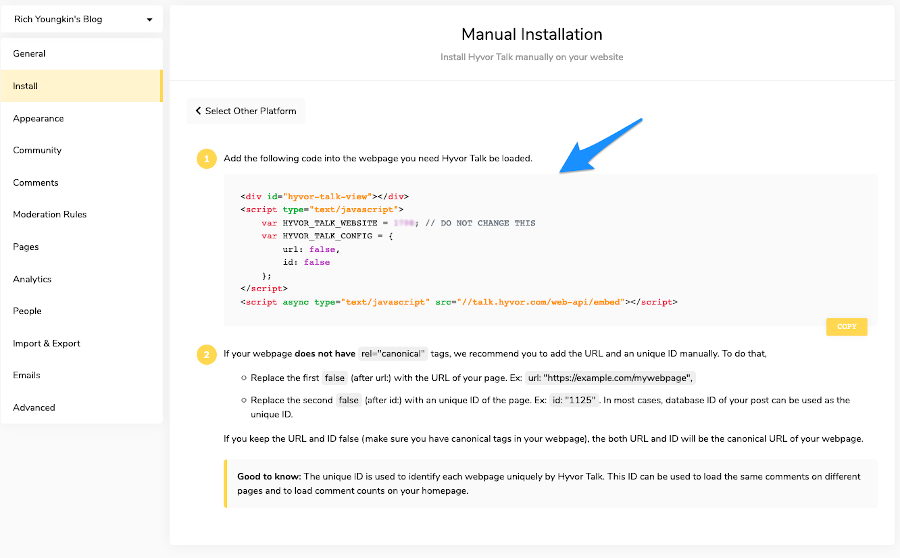
You’ll need to “cut & paste” the code from step one of this page into your theme’s layouts/partials/comments.html file (You should be able to ignore step 2). When done it should look something like this:
<!-- disqus end -->
<div id="disqus-comment"></div>
{{ if .Site.Params.disqus_proxy }}
<script src="{{ "js/iDisqus.js" | relURL }}"></script>
<script>
var disq = new iDisqus('disqus-comment', {
    forum: '{{ .Site.DisqusShortname}}',
    api: '{{ .Site.Params.disqus_proxy }}',
	site: '{{ .Site.Params.disqus_site }}',
    mode: 1,
    timeout: 5000,
    init: true
});
</script>
{{ else if .Site.DisqusShortname }}
{{ template "_internal/disqus.html" . }}
{{ else if .Site.Params.hyvor }}
<div id="hyvor-talk-view"></div>
<script type="text/javascript">
    var HYVOR_TALK_WEBSITE = XXXXXXX; // DO NOT CHANGE THIS
    var HYVOR_TALK_CONFIG = {
        url: false,
        id: false
};
</script>
{{ end }}
Specifically note the {{ else if .Site.Params.hyvor }} block. Except for the value of HYVOR_TALK_WEBSITE, which should be your specific assigned value, this is the block you pasted into the comments.html file. It’s pasted just prior to the {{ end }} line. .Site.Params.hyvor refers to a parameter in your config.toml file in the [params] section, e.g.:
[params]
  #header_image = "images/MeAtJackson.jpeg"
  header_image = "images/main_go_wideandtall_darklayer.jpeg"
  title = "Software Engineering"
  slogan = "$ grep -rni \"The how's and why's\" ."
  SEOTitle = "Rich Youngkin Blog"
  keyword = "Rich, Youngkin, Raspberry, Pi, Docker, Kubernetes, Go, Golang, Microservice"

  # Comments
  hyvor = true

  # Sidebar settings
The pertinent change is the block starting with # Comments. hyvor = true enables Hyvor commenting.
The bottom of each blog post will now look something like this:
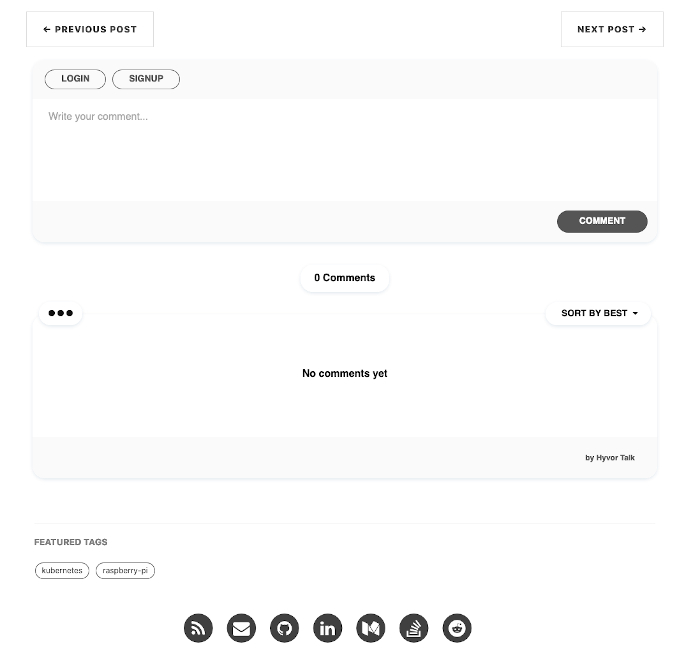
To get exactly this appearance do this from the Hyvor Console:
- To match the blog’s theme colors, click on the “Appearance” entry in the left-hand navigation section of your Hyvor Console. Then click on “Accent Color” and in the resulting color picker in the bottom left enter the hex color code
#555555. Then click “Save”. - To remove the emoji reactions, click on the “Community” entry in the left-hand navigation section of your Hyvor Console. The second item in settings, just under “Comments Note”, is “Reactions”. Turn this off and click “Save”.
Optional Table of Contents
I wanted to have the option to include a table of contents on selected articles. As mentioned above, I added a toc item in the archetypes/post.md file:
---
title: "{{ replace .Name "-" " " | title }}"
#description: <descriptive text here>
date: {{ .Date }}
draft: true
toc: false
image: ""
tags: []
categories: []
---

# Descriptive text here...
<!--more-->
If toc is set to true then Hugo will generate a table of contents for the associated article. I changed the original themes/hugo-theme-cleanwhite/layouts/_default/single.html file FROM:
<!-- Post Content -->
<article>
    <div class="container">
        <div class="row">

            <!-- Post Container -->
            <div class="
                col-lg-11 col-lg-offset-1
                col-md-10 col-md-offset-1
                post-container">

                {{ if not (eq (.Param "showtoc") false) }}
                <header>
                    <h2>TOC</h2>
                </header>
                {{.TableOfContents}}
                {{ end }}
                {{ .Content }}
TO:
<!-- Post Content -->
<article>
    <div class="container">
        <div class="row">

            <!-- Post Container -->
            <div class="
                col-lg-11 col-lg-offset-1
                col-md-10 col-md-offset-1
                post-container">

                {{ if (.Params.toc) }}
                <header>
                    <h2>Contents</h2>
                </header>
                {{.TableOfContents}}
                {{ end }}
                {{ .Content }}
Specifically the block starting with {{ if not (eq (.Param "showtoc") false) }} ... was changed to the block starting with {{ if (.Params.toc) }} .... So instead of looking for the showtoc parameter in config.toml, .Params.toc directs the HTML template to look in the “front matter” at the top of an article for a toc entry.
Theme Customizations
NOTE: The manner of theme customizations described in this section is not the right way to customize a theme!
Hugo has built in capability for customizing themes that doesn’t require copying and modifiying the theme itself. See Hugo Themes for a good description of the recommended approach to theme customization. So while the files referenced below are the same ones to be modified, copies of these files containing the overrides should be placed in the appropriate directories as noted in that article.
What follows below should be read with the above caution in mind.
I used the Clean White theme, but I wanted a different look for:
- Title and Description (looking for “green screen” feel)
- Sidebar Tags and social networking “badges” - too dim, wanted to darken
- Post summaries - these appear under each post Title on the home page. They’re a brief summary of the post. I wanted these to be slightly darker.
- Wanted to change some fonts
Here’s what I changed:
- I copied Clean White theme GitHub repository to my own copy
- I modified
themes/hugo-theme-cleanwhite-rsy/static/css/hux-blog.min.css- Note: I “pretty printed” this file with the Atom
css-cleanpackage to make it easier to visualize in this article, but it needs to be unchanged in the blog source in order for the web site to render properly
- Note: I “pretty printed” this file with the Atom
- I modified
Change the Blog Header
I wanted to change the text fonts, font size, and color in the Navigation Bar, Blog Title, and the Blog Subtitle.
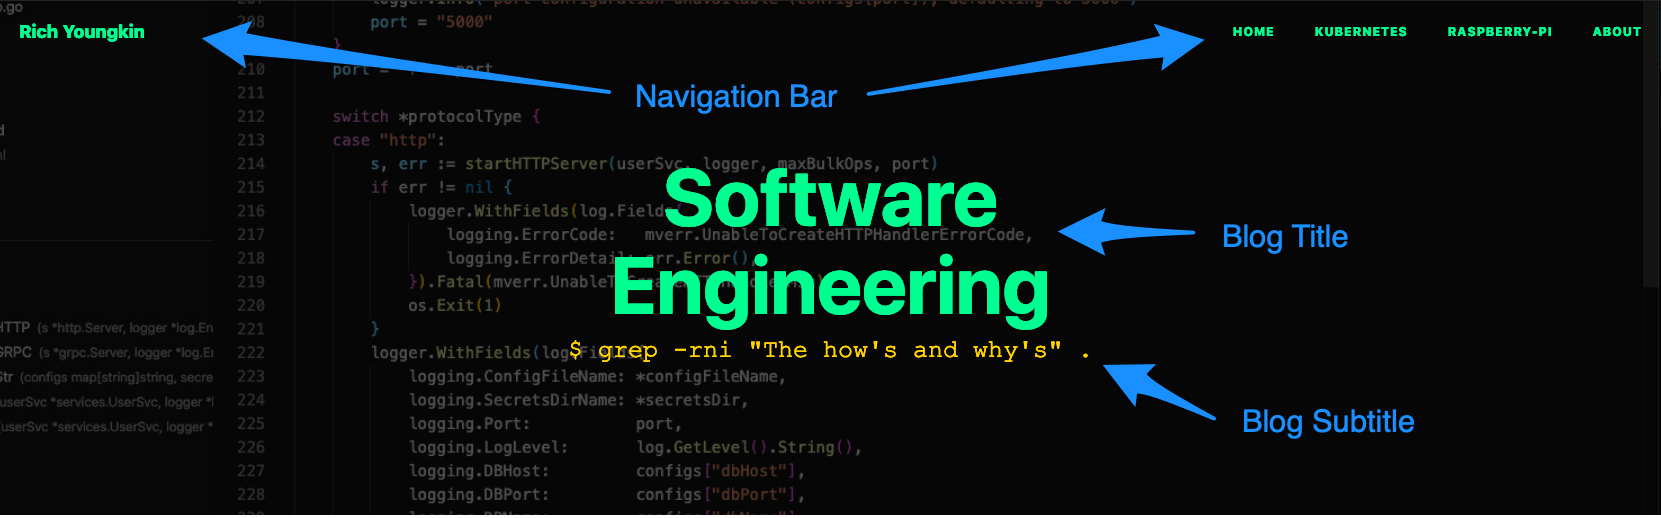
I changed the text color in the Blog Title to green by changing the color: #00FA9A element. Here’s the context for the changes:
.intro-header .page-heading,
.intro-header .post-heading,
.intro-header .site-heading {
  padding : 85px 0 55px;
  color   : #00FA9A;
}
I changed the text color in the Navigation Bar to green by changing the color: #00FA9A element. Here’s the context for the changes:
  .navbar-custom .navbar-brand {
    padding     : 20px;
    color       : #00FA9A;
    line-height : 20px;
  }

  ...

    .navbar-custom .nav li a {
    padding : 20px;
    color   : #00FA9A;
  }
I changed the text rendering (font and font-color) for the Blog Subtitle (‘slogan’ in config.toml) by changing color: #FFD700,font-size: 25px, and adding font-family: Courier New, monospace;. Here’s the context for the changes.
.intro-header .page-heading .subheading,
.intro-header .site-heading .subheading {
  display     : block;
  margin      : 10px 0 0;
  color       : #FFD700;
  font-family : -apple-system,
                "Helvetica Neue",
                Arial,
                "PingFang SC",
                "Hiragino Sans GB",
                STHeiti,
                "Microsoft YaHei",
                "Microsoft JhengHei",
                "Source Han Sans SC",
                "Noto Sans CJK SC",
                "Source Han Sans CN",
                "Noto Sans SC",
                "Source Han Sans TC",
                "Noto Sans CJK TC",
                "WenQuanYi Micro Hei",
                SimSun,
                sans-serif;
  font-family : Courier New,
                monospace;
  font-size   : 25px;
  font-weight : 300;
  line-height : 1.7;
  line-height : 1.1;
}
Change the Post Summaries
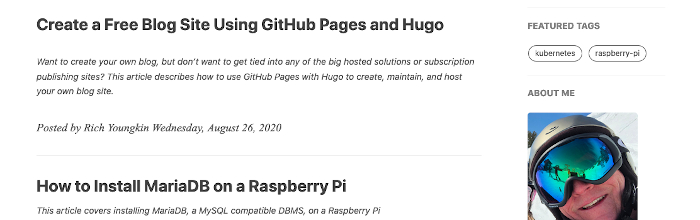
The summary text and post date were a light gray. To improve the contrast I changed the .post-meta and .post-content-preview colors to #555555.
.post-meta{
    font-family:Lora,'Times New Roman',serif;
    color:#555555;
    font-size:16px;
    font-style:italic;
    margin-top:0}

...

.post-content-preview{
    font-size:13px;
    font-style:italic;
    color:#555555
    }
Change the Sidebar
In the Sidebar I wanted to change the text and border color of the “FEATURED TAGS”, the text color of the short bio, and the background color of the social networking ‘badges’.
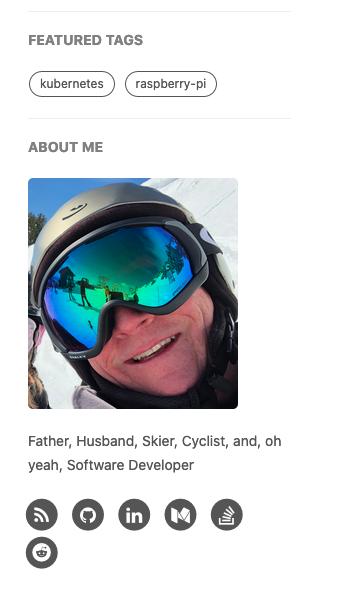
The color of the “About Me” short bio and the social badges was too light for my tastes. I changed these colors to a darker gray by changing .sidebar-container {...} and .sidebar-container a {...} color elements to #555555. Here’s the context for these changes:
.sidebar-container {
  color     : #555555;
  font-size : 14px;
}

.sidebar-container h5 {
  padding-bottom : 1em;
  color          : gray;
}

.sidebar-container h5 a {
  color           : gray!important;
  text-decoration : none;
}

.sidebar-container a {
  color : #555555!important;
}
As above, the text and border color of the “Featured Tags” was too light for me. I changed this to a darker gray by changing the .sidebar-container .tags a {...} border-color to #555555 and the .tags a {... color: ... border:...} color and border elements to #FFD700 and 1px solid rgba(255,215,0,0.8) respectively. Here’s the context for these changes:
.sidebar-container .tags a {
  border-color : #555555;
}

...

.tags a {
  display         : inline-block;
  margin          : 0 1px;
  margin-bottom   : 6px;
  padding         : 0 10px;
  color           : #FFD700;
  border          : 1px solid rgba(255,215,0,0.8);
  border-radius   : 999em;
  text-decoration : none;
  font-size       : 12px;
  line-height     : 24px;
}
Image manipulation
I wanted to modify some of the images used in the site, primarily the background images used in the page headers. I used GIMP to manipulate the blog images. I mostly changed the following:
- Resized the images to fit within the page
- Added a dark layer over the top of the images to increase contrast with the blog header elements (i.e., navigation bar, title, subtitle)
- I mostly used
#4d4d4dand#373737as the colors, amodeofnormal, and anOpacityof 80%
- I mostly used